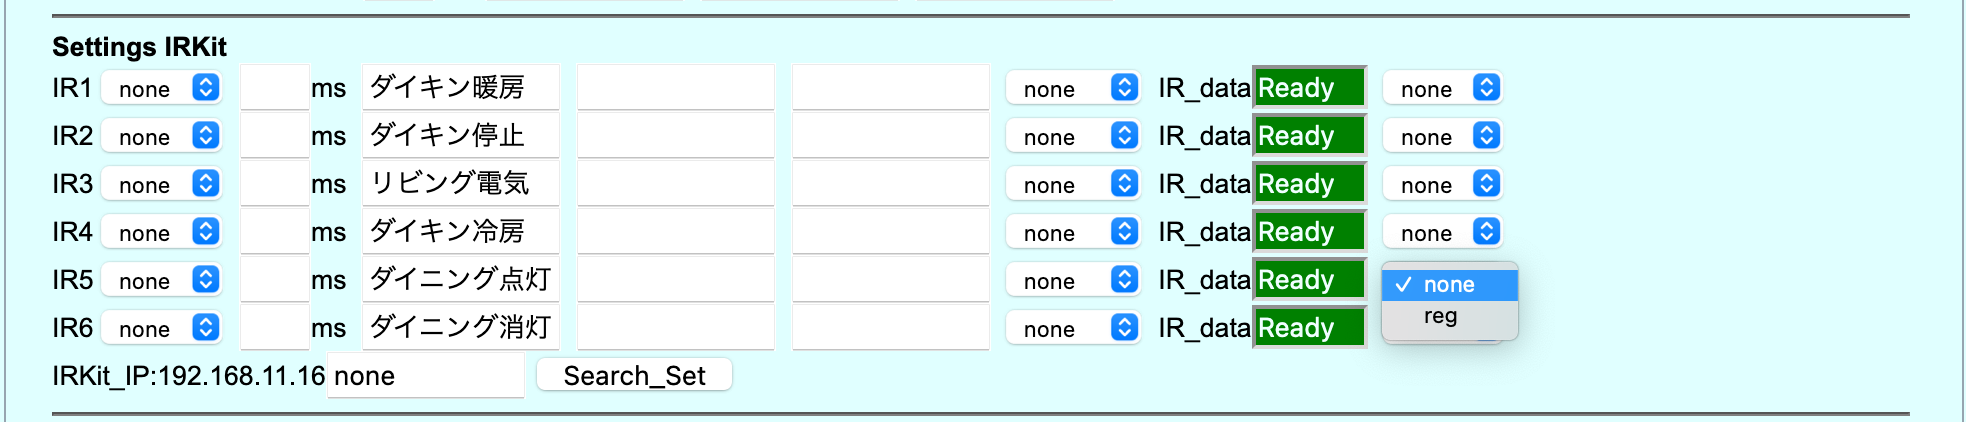
About this

Purpose of this site

  • About the hardware and software of the IOT House that has been under development for many years
  • Computers, peripherals, networks, and IT fairy tales that you have experienced so far
  • I hope it will be a hint for an environment where parents can compliment and raise their children.
    • Practical use of things that children have learned from experiments and play-> Parents are pleased-> Parents praise children-> Children learn more and devise to get praise-> Parents children Compliment-> Children grow up-> Society grows up

Author

  • kujiranodanna: A long time ago 1970s Computer peripherals and network equipment maintenance, network engineers, part-time lecturers at IT vocational schools, part-time lecturers at universities (information basics), building management in recent years
  • People who develop and practice IOT house using Raspberry Pi or old PC and Linux

What is Practical IOT House?

  • It is a home appliance automation, crime prevention, disaster prevention, voice response, monitoring and control system.
  • It is built with shell script, C, javascript and can be operated with a browser.
    • Check the room temperature from the outside and operate the cooler
    • Turn on the lights of the entrance and room when it gets dark outside in the evening
    • Watering the vegetable garden at dawn based on the outside humidity
    • Email a video when the security sensor works
    • Play music at a fixed time
    • Notify by e-mail and phone (wangiri) when the fire detector issues a report
    • The underfloor ventilation fan is operated intermittently based on the outside air humidity.
  • Introduced additional Homebridge Alexa, voice and remote control of home appliances with Alexa app
  • Let’s realize home electronics & home security with Raspberry Pi that is stowed in the back of the desk

https://iot-house.jpn.org
Practical IOT House

IOT-House_old_pc

What is IOT-House_old_pc?

  • It’s old and it’s a home and a thing with a laptop using Windows.
  • IOT-House_old_pc is a port of IOT-House from Raspberry Pi to Ubuntu 18.04 LTS.
  • Moist Sunhayato’s MM-CP2112A to GPIO with heavy environmental gas, BME680 and temperature sensor AM2320.
  • IOT-House_old_pc is good and common because it is used.
  • For the operating environment, enter a notebook with a CPU of 1GHz and a memory of about 1GB.
  • raspberry pi zero W, the power consumption of the laptop (25W dose) is.iot-house_old_pc_img
    Left debug MAC, Right old PC,MM-CP2112A+Self-made board,I2C sensor BME680,AM2320

Hardware

  • Please prepare the flash memory with the following capacity.
    1
    2
    3
    4
    5
    6
    7
    8
    9
    10
    11
    12
    13
    fdisk /dev/sdb

    Welcome to fdisk (util-linux 2.29.2).
    Changes will remain in memory only, until you decide to write them.
    Be careful before using the write command.

    Command (m for help): p
    Disk /dev/mmcblk0: 7.3 GiB, 7820279808 bytes, 15273984 sectors
    Units: sectors of 1 * 512 = 512 bytes
    Sector size (logical/physical): 512 bytes / 512 bytes
    I/O size (minimum/optimal): 512 bytes / 512 bytes
    Disklabel type: dos
    Disk identifier: 0x15ae16d5

    Install

  • Download the image from the URLIOT-House_old_pc_xx.7z
  • Unzip the downloaded file, IOT-House_old_pc_xx.7z, and write IOT-House_old_pc_xx.img to flash memory, for example dd command
    1
    dd if=IOT-House_old_pc_xx.img of=/dev/sdb bs=100M
    After installing the flash memory and MM-CP2112A to the USB of the laptop computer, turn on the power, it may take about 5 minutes to start up.

Setting

  • When the login screen appears, log in with user: remote, password: hand

  • Set the network settings according to each environment. By default, the preferred LAN and host name iot000

  • From another PC, log in with user: remote, password: hand at http://iot000.local

  • Set when the Control panel is displayed

  • Once the network settings are complete, you can shorten the startup time without the following command GUI.

    1
    sudo systemctl set-default multi-user.target
    iot-house_old_pc_control_panel-1
    iot-house_old_pc_control_panel-2
  • The setting method is the same as IOT-House of raspberry pi

cp2112_BME680

What is CP2112?

  • USB<->I2C conversion chip (Silicon Laboratories Single-Chip HID USB to SMBus Master Bridg) for Linux and Windows USB You can use 8 GPIOs and I2C from, here we are using the module board of Sunhayato’s MM-CP2122A.

  • MM-CP2122A Selling phraseI2C connection sensor and GPIO (8 pin) can be controlled directly from a PC application without programming the microcomputer. is a difficult task, and programming requires an understanding of the HIDAPI and CP2112 interface specifications below.

  • When I connect to the USB of my lubuntu lts 18.04 Linux machine, the driver is loaded as shown below and the HID device is recognized.

    1
    2
    3
    4
    5
    # lsmod |grep cp2112
    hid_cp2112 24576 0
    hid 102400 3 hid_cp2112,hid_generic,usbhid
    # ll /dev/hidraw-cp2112
    lrwxrwxrwx 1 root root 7 4月 6 16:54 /dev/hidraw-cp2112 -> hidraw0
  • From here, we verified the operation of GPIO and I2C connection temperature/humidity sensor AM2320 and environmental gas sensor BME680 based on the above materials and collected information pepocp2112ctl.cThe explanation is based on the program.

    cp2112_BME680_debug
  • Install the package for development libhidapi

    1
    2
    # apt install libhidapi-dev
    libhidapi-dev libhidapi-hidraw0 libhidapi-libusb0
  • Get and compile the following filesFork from BoschSensortec/BME680_driver

    1
    2
    3
    4
    5
    6
    7
    8
    9
    10
    11
    bme680.c  bme680.h  bme680_defs.h  pepocp2112ctl.c
    # gcc -Wall -o pepocp2112ctl pepocp2112ctl.c bme680.c -lhidapi-hidraw
    # ll
    total 144
    drwxr-xr-x 2 root root 140 4月 6 17:39 ./
    drwxr-xr-x 3 www-data www-data 840 4月 6 17:39 ../
    -rwxr-xr-x 1 root root 44364 4月 13 2019 bme680.c*
    -rwxr-xr-x 1 root root 8353 4月 13 2019 bme680.h*
    -rwxr-xr-x 1 root root 17134 4月 13 2019 bme680_defs.h*
    -rwxr-xr-x 1 root root 34644 4月 6 17:39 pepocp2112ctl*
    -rw-r--r-- 1 root root 30626 3月 28 16:26 pepocp2112ctl.c
  • Programming example, SMBus Devices operation only Extract from source and explain only important parts, check the source for others. (Experience shows that GPIO needs to be operated in multiple processes, so there is a considerable amount using semaphore.)

    • CP2112’s I2C connection device BME680 sets the I2C address, required commands, data, and byte counter in the buffer, sends it with hid_send_feature_report, and waits for a response to the command if necessary.
    • The BME680 write sets the command(CP2112_DATA_WRITE), register address, data, and number of bytes and writes it to the device.
      1
      2
      3
      4
      5
      6
      7
      8
      9
      10
      int8_t user_i2c_write(uint8_t dev_id, uint8_t reg_addr, uint8_t *reg_data, uint16_t len)
      {
      .
      reg[0] = CP2112_DATA_WRITE;
      reg[1] = BME680_I2C_ADDR_PRIMARY<<1;
      reg[2] = len+1;
      reg[3] = reg_addr;
      for (int8_t i=4; i<len+4; i++)
      reg[i] = reg_data[i-4];
      rslt = hid_send_feature_report(hd, reg, len+4);
      • Dump of buffer etc. during debugging
        1
        2
        3
        4
        5
        user_i2c_write() dev_id: ec reg_addr: e0 len: 1
        user_i2c_write()1 rslt: 5 len: 1
        reg dump start
        0:14 1:ec 2:02 3:e0 4:b6
        reg dump end
    • The BME680 read first sends the register address with a write command.
      Next, send the I2C address read request command(CP2112_DATA_READ_REQ),Wait for Polling, status confirmation(CP2112_DATA_READ_RESPONS),until the data is ready(CP2112_DATA_READ_FORCE_SEND),and then read the data from the device.
      1
      2
      3
      4
      5
      6
      7
      8
      9
      10
      11
      12
      13
      14
      15
      16
      17
      18
      19
      20
      21
      22
      23
      24
      25
      26
      27
      28
      29
      30
      31
      32
      33
      34
      35
      36
      37
      38
      39
      40
      41
      42
      43
      44
      45
      46
      47
      48
      49
      50
      51
      52
      53
      54
      55
      56
      57
      58
      59
      60
      61
      int8_t user_i2c_read(uint8_t dev_id, uint8_t reg_addr, uint8_t *reg_data, uint16_t len)
      {
      .
      reg[0] = CP2112_DATA_WRITE;
      reg[1] = BME680_I2C_ADDR_PRIMARY<<1;
      reg[2] = 1;
      reg[3] = reg_addr;
      rslt = hid_send_feature_report(hd, reg, 4);
      .
      user_delay_ms(HID_WAIT);
      reg[0] = CP2112_DATA_READ_REQ;
      reg[1] = BME680_I2C_ADDR_PRIMARY<<1;
      reg[2] = 0x00; // reads length_high
      reg[3] = len; // reads length_low
      rslt = hid_send_feature_report(hd, reg, 4);
      .
      user_delay_ms(HID_WAIT);
      while (retry_cnt < 3)
      {
      /* SMBus Polling */
      reg[0] = CP2112_DATA_READ_FORCE_SEND;
      reg[1] = 0x00; // reads length_high
      reg[2] = len; // reads length_low
      rslt = hid_send_feature_report(hd, reg, 3);
      .
      user_delay_ms(HID_WAIT);
      rslt = hid_read_timeout(hd, buf_in, len+3, timeout);
      .
      /*
      buf_in[0]:hid_report ID->0x13:CP2112_DATA_READ_RESPONS
      buf_in[1]:hid_status 0x00->Idle ,x01->Busy ,x02->Complete
      ,buf_in[2]:hid_read_length
      buf_in[3]-:Following_BME680_Read_Data
      */
      if (buf_in[0] == CP2112_DATA_READ_RESPONS)
      {
      if (buf_in[1] == 0x00 || buf_in[1] == 0x02 || buf_in[1] == 0x03)
      .
      break;
      retry_cnt++; // Busy or Idle or Other
      user_delay_ms(HID_WAIT);
      continue;
      }
      if (buf_in[0] == CP2112_TRANSFER_STATUS_RESP)
      {
      .
      user_delay_ms(HID_WAIT);
      retry_cnt++;
      continue;
      }
      }
      .
      if(buf_in[2] > 0 && rslt > 3 && buf_in[2] < rslt)
      {
      int8_t j = buf_in[2];
      for (int8_t i=0; i < j; i++)
      {
      reg_data[i] = buf_in[i+3];
      }
      return 0;
      }
      • Dump of buffer etc. during debugging
        1
        2
        3
        4
        5
        6
        7
        8
        9
        10
        11
        user_i2c_read dev_id: ec reg_addr: d0 reg_data: 04 len: 1
        user_i2c_read()hid_read_timeout rslt:4 retry_cnt:0
        buf_in dump start
        0:13 1:02 2:01 3:61
        buf_in dump end

        user_i2c_read dev_id: ec reg_addr: 89 reg_data: 04 len: 25
        user_i2c_read()hid_read_timeout rslt:28 retry_cnt:0
        buf_in dump start
        0:13 1:02 2:19 3:40 4:a3 5:66 6:03 7:2f 8:80 9:8e 10:c9 11:d6 12:58 13:ff 14:de 15:19 16:cf 17:ff 18:2f 19:1e 20:00 21:00 22:1a 23:f3 24:e7 25:f6 26:1e 27:02
        buf_in dump end
  • Please check the source code below
    https://github.com/kujiranodanna/BME680_driver

serial communication software

What is serial communication software epicon?

  • epicon is a Linux serial communication software.

  • In practice IOT House uses the thermo-hygrometer AM2321 sensor and AI/DIO for control with TOCOS TWE-Lite via serial communication from the USB connection ToCoStick of Raspberry Pi.

  • I think that network devices such as Switch and Router that can be configured with serial ports and console PCs can be used regardless of manufacturer or model.

  • When automating the settings, Cisco Switch and Router copy and paste the text data created in advance and fill in the config.
    At this time, it is important to send delay of characters and line breaks to prevent the config data from being missed.

  • epicon supports the transmission delay of important characters and line breaks as this serial console, and you can copy and paste the config with confidence.

  • In addition, file transfer software such as simple telnet and zmodem, shell, macro, start of external software, etc. CUI, but it is multifunctional and compact.

  • Installation
    Download
    https://osdn.net/projects/pepolinux/releases/p3211

    1
    2
    3
    4
    5
    6
    7
    # tar xvfz epicon-XX.XX.tar.gz
    # cd epicon
    # ./configure
    # make
    # make install
    uninstall
    # make uninstall
  • How to use

    • Startup, no options (com1: / dev / ttys0 port, 9600bps, 8bit non-parity)
      1
      2
      3
      4
      5
      6
      7
      8
      9
      10
      11
      12
      # epicon

      ** Welcome to epicon Version-5.2 Copyright Isamu Yamauchi compiled:Feb 24 2021 **
      exec shell ~!
      send binary files ~f
      send break ~b
      call rz,sz,sx,rx ~rz,~sz,~sx,~rx
      call kermit ~sk,~rk
      external command ~C
      change speed ~c
      exit ~.
      Connected /dev/ttyS0
    • How to exit
      Enter~.
    • Communication state->to shell->コマンド入力->Return to the original communication state with exit
      Enter~!
      1
      2
      3
      4
      5
      6
      7
      8
      9
      10
      11
        epicon wait
      # ls
      AUTHORS README configure.ac install-sh
      COPYING aclocal.m4 depcomp missing
      ChangeLog autom4te.cache epicon.c patch-gkermit1.0+counter-CentOS4.2
      INSTALL config.h epicon.h patch-gkermit1.0+counter1.2.1
      Makefile.am config.h.in epicon.nr sample.scr
      Makefile.in config.status epicon_main.c stamp-h1
      NEWS configure epicon_uty.c
      # exit
      epicon run
    • Switch settings and options available (/dev/ttyUSB0,19200bps, character delay:30ms, CR delay:50ms) In my old experience, setting this delay will not cause the config to be missed.
      1
      # epicon -d 30 -D 50 -s 19200 -l /dev/ttyUSB0
    • Switch settings and options available (telnet, character delay:20ms, CR delay:50ms)
      1
      2
      3
      4
      5
      6
      7
      8
      9
      10
      11
      12
      13
      14
      15
      16
      # epicon -d 20 -D 50 -n 192.168.0.1:23

      ** Welcome to epicon Version-5.2 Copyright Isamu Yamauchi compiled:Feb 24 2021 **
      exec shell ~!
      send binary files ~f
      send break ~b
      call rz,sz,sx,rx ~rz,~sz,~sx,~rx
      call kermit ~sk,~rk
      external command ~C
      change speed ~c
      exit ~.

      Telnet Server 1.10 All rights reserved.


      login :
  • “-c” option: Specify external script

    • mono-wireless Thermo-hygrometer AM2321 sensor, analog input, digital input/output signal from a remote location with wireless modules TWELITE and MONOSTICK Programs for remote monitoring and control It is used in pepotocsctl .twelite_dip_monostick
    • The following creates a script that reads the temperature and humidity from the AM2321 sensor and starts epicon.
      1
      2
      3
      4
      5
      6
      7
      8
      9
      10
      11
      12
      13
      14
      15
      16
      17
      18
      19
      20
      21
      22
      23
      24
      25
      26
      # /usr/local/bin/epicon -s 115200 -ql /dev/ttyUSBTWE-Lite -c $CMD
      # cat $CMD
      #!/bin/bash
      RETRY=5
      I2CRD="-1"
      while [ ${RETRY} -ne 0 ];do
      retry_time=`echo -en $RANDOM |cut -c 1-2`
      echo -en ":7888AA015C0000X\r\n"
      msleep 50
      read -s -t 1 I2CRD || I2CRD="-1"
      echo -en ":7888AA015C03020004X\r\n"
      msleep 50
      read -s -t 1 I2CRD || I2CRD="-1"
      msleep
      echo -en ":7888AA025C0006X\r\n"
      msleep 50
      read -s -n 28 -t 1 I2CRD || I2CRD="-1"
      TMP=`echo -en ${I2CRD} | wc -c`
      [ ${TMP} -eq 28 ] && break
      RETRY=$((${RETRY} - 1))
      [ ${RETRY} -eq 0 ] && break
      RETRY=$((${RETRY} - 1))
      msleep $retry_time
      I2CRD="-1"
      done
      echo -en ${I2CRD} >/dev/stderr
  • Manual excerpt

    1
    2
    3
    4
    5
    6
    7
    8
    9
    10
    11
    12
    13
    14
    15
    16
    17
    18
    19
    20
    21
    22
    23
    24
    25
    26
    27
    28
    29
    30
    31
    32
    33
    34
    35
    # man epicon

    epicon(1) epicon Manuals

    NAME
    epicon is Easy Personal Interface Console terminal software. First I
    am sorry. Because my English linguistic power is very shabby, this sen‐
    tence is being translated by the machine. Because of that, read it in
    the interpretation which it is tolerant of though it thinks that it is
    a little funny translation.

    SYNOPSIS
    usage:
    epicon [-options [argument] [-options [argument]]
    [-b ] <--escape cannot be used
    [-c external_command]
    [-d send_charcacter_delay(ms)]
    [-D send_CR_delay(ms)]
    [-e escape_char]
    [-f send_file]
    [-F send_file_effective_delay]
    [-m ] <--input echo mode
    [-M ] <--line mode
    [-l com_port]
    [-L output_log_file]
    [-n ip_address[:port]]
    [-p [server_port]]
    [-q ] <--quiet mode
    [-s speed]
    [-v ] <--show version
    [-x bit_length (5|6|7) parity(o|e|n) stop_bit (1|2)]
    [-z ] <--auto rz prohibition

    defaults:
    speed: 9600b/s (Higest of 460800)
  • Please check the source code below
    https://github.com/kujiranodanna/IOT-House/tree/master/raspberrypi/usr/src/epicon

config_irkit

What is IRkit

  • IRKit is a network-compatible learning infrared remote controller

IRKit Home appliance operation

  • At the IOT House, the Raspberry pi reads infrared data from the IRkit via WiFi, sends it on time and at each input event, and operates home appliances.
Operate IRKit with Raspberry pi
  • Infrared data of home appliances is read from IRkit, and transmission, scheduled operation, and operation by input event are all performed from a Web browser.

  • If you do not know the IP address of IRkit, press the Search_Set button in the state of DIO Settings TAB text box none from the Web browser, and the IP address of IRkit will be After a few minutes, it will be automatically detected and displayed, and then perform the following operations.

  • Infrared to IRkit Immediately after operating the remote controller, read the infrared data of home appliances from IRkit with a Web browser. (Data can be read only immediately after operating the infrared remote controller and buttons)

irkit_rasp_reg
  • Read the infrared data of home appliances from IRkit with Raspberry pi with the following GET command.
    1
    # curl -s -m $RETRYTIME --retry $RETRY --user-agent ${USERAGENT} http://${IP}/messages --header "X-Requested-With: PepoLinux" >${IRFILE}
  • The read data is stored in the following json format, which is sent out at each timing to operate home appliances.
    1
    2
    # cat .irdata_0
    {"format":"raw","freq":38,"data":[3968,1927,10762,1927,2911,1037,2911,1037,843,1111,843,1111,843,1111,843,1111,843,1111,843,1111,2813,1073,843,1111,843,1111,843,1111,843,1111,843,1111,843,1111,2911,1037,1037,1037,2911,1037,843,1111,843,1111,843,1111,843,1111,843,1111,843,1111,968,968,843,1111,843,1111,843,1111,843,1111,843,1111,843,1111,843,1111,968,968,2911,968,843,1111,2911,1037,2911,1037,843,1111,2911,1037,2911,1037,843,21415,3834,1927,10762,1927,2911,1037,2911,1037,843,1111,843,1111,843,1111,843,1111,843,1111,843,1111,2813,1073,843,1111,843,1111,843,1111,843,1111,843,1111,843,1111,2911,1037,1037,1037,2911,1037,843,1111,843,1111,843,1111,843,1111,843,1111,843,1111,968,968,843,1111,843,1111,843,1111,843,1111,843,1111,843,1111,843,1111,968,968,2911,968,843,1111,2911,1037,2911,1037,843,1111,2911,1037,2911,1037,843,21415,3834,1927,10762,1927,2911,1037,2911,1037,843,1111,843,1111,843,1111,843,1111,843,1111,843,1111,2813,1073,843,1111,843,1111,843,1111,843,1111,843,1111,843,1111,2911,1037,1037,1037,2911,1037,843,1111,843,1111,843,1111,843,1111,843,1111,843,1111,968,968,843,1111,843,1111,843,1111,843,1111,843,1111,843,1111,843,1111,968,968,2911,968,843,1111,2911,1037,2911,1037,843,1111,2911,1037,2911,1037,843]}
  • To read infrared data of home appliances from IRkit with Raspberry pi, use the following POST command.
    1
    # curl -s -m $RETRYTIME --retry $RETRY --user-agent ${USERAGENT} -X POST -F upfile=@/${IRFILE} http://${IP}/messages >${DOCFILE}
  • IRkit routine operations are performed with Auto Prosess Tab.
irkit_auto_img
  • IRkit input event operations are performed with DIO Contorol Tab.
irkit_event_img
  • Please check the source code below

https://github.com/kujiranodanna/IOT-House/blob/master/raspberrypi/www/remote-hand/irkit_reg.cgi

https://github.com/kujiranodanna/IOT-House/blob/master/raspberrypi/www/remote-hand/irkit_post.cgi

Smell sensor

What is pepoiaq2led

  • Gas resistance value read from environmental gas sensor BME680 50 counts every 5 minutes Average value 80%, temperature 10%, humidity 10% Air quality calculated from: IAQ (indoor air quality) 0 to 500 The browser is good (with numerical values) It is expressed in green)~ very_bad (red) colors.
bme680_iaq_img
  • You can turn on the 3-color LED from the GPIO output with pepoiaq2led.
  • If it is always running, it can be used as an odor sensor appliance.
  • pepoiaq2led is started via daemontools with the following command.
    1
    2
    3
    4
    # cd /www/pepolinux
    # ln -s /usr/local/bin/pepoiaq2led iaqled
    # cd /service/
    # ln -s /www/pepolinux/iaqled iaqled
  • pepoiaq2led started by daemontools is stopped/started/confirmed by the following command.
    1
    2
    3
    # svc -d /www/pepolinux/iaqled
    # svc -u /www/pepolinux/iaqled
    # svstat /www/pepolinux/iaqled
  • Raspberry pi’s BME680 and 3-color LED detect the smell of garlic in a tube Demo video

config_twelite

Make a simple illuminometer with a solar panel of a one dolloar calculator

  • Measure the generated voltage of the solar panel with the analog input of TWELITE DIP
twelite_solar_cell_img
  • Graph the analog input voltage, correct the variation of the generated voltage depending on the measurement location with the slice voltage, and digitize it as high/low
twelite_solar_cell_img
  • Detect sunrise and sunset at high/low, turn on/off the entrance lamp
    • Do not simply turn the entrance lamp on and off at high/low (sunset/sunrise)
    • Turns off for 30 seconds (30000ms) every 5 minutes in consideration of crime prevention and energy saving.
    • Specific settings are done in Auto Process Tab
      • Every 5 minutes from 17:00 to 24:00, outdoor illuminance=low is judged and entrance lamp->low(30seconds)30 seconds after turning off, it lights for about 4 and a half minutes.
      • Every 5 minutes from 0 to 6 o’clock, Outdoor illuminance=low is judged and Entrance lamp->low(30seconds)
      • Every 5 minutes from 5 to 7 o’clock, Outdoor illuminance=high is judged and entrance lamp->low The lamp turns off after sunrise
twelite_solar_cell_img
Collaboration video of Raspberry_pi and Tocos wireless module

pepotocsctl

What is GPIO wireless?

  • What is pepotocsctl?mono-wireless The thermo-hygrometer AM2321 sensor, analog input, and digital input/output signals are separated by the wireless modules TWELITE and MONOSTICK. It is a program that can be remotely monitored and controlled from a location.
    twlite_img
    pepotocsctl alone does not work, you need a separate epicon. You can operate the GPIO and AM2321 sensors of the Tocos wireless module with commands.
    1
    2
    # pepotocosctl
    usage /usr/local/bin/pepotocosctl read->chno:0-6 | write->chno:0-6 [DO:0|1|f] to 300000ms
    Read for 4 ports of DI (digital input)
    1
    # pepotocsctl 0 7
    The most port read of DI (digital input)
    1
    # pepotocsctl 1 1
    DO (Digital Out Pout) Light 1 to the first port
    1
    2
    # pepotocsctl 1 1
    1
    DO (Digital Out Pout) Write 1 to the first port and hold for 5 seconds
    1
    2
    # pepotocsctl 1 1 5000
    0
    I2C thermo-hygrometer AM2321 sensor read
    1
    2
    # pepotocsctl 5
    2016/01/20,19:16:19,4.0℃,75.4%
    Analog input read
    1
    2
    # pepotocosctl 6
    4080,4080,4080,4080
    Light after read
    1
    2
    # pepotocosctl 0 0
    7;4080,4080,4080,4080
    Digital input and analog input read
    1
    2
    # pepotocosctl 7
    f;1952,4080,4080,4080
    Wait for the read, DI change for the specified time
    1
    2
    # pepotocosctl 7 120
    e;4080,4080,4080,4080
  • Please check the source code below
    https://github.com/kujiranodanna/IOT-House/blob/master/raspberrypi/usr/local/bin/pepotocosctl

pepogpioctld

What is pepogpioctld

  • It is a daemon that quantifies the air quality based on the input / output control of gpio and the data of the environmental gas sensor BME680.

  • When the BME680 sensor is connected, the gas resistance value is 50 counts every 5 minutes from the 2021/02/04/17:22: 23,10.2,43.0,1018.9,3436 value created by pepobme680. Based on the average value of 80%, temperature of 10%, and humidity of 10%, the following air quality: IAQ (indoor air quality) is calculated and added.

  • IAQ is Sample 0(Good) to 500(Hazardous) Temperature(17-28℃):10% Humidity(40-70%):10% Gas(Gas±Gas_base/Gas_base):80%

    1
    2
    3
    4
    5
    6
    7
    8
    9
    10
    11
    12
    13
    14
    15
    16
    [iot00f:root#] cat /www/remote-hand/tmp/.pepobme680
    2021/02/04/17:22:23,10.2,43.0,1018.9,3436
    Date/time, temperature, humidity, pressure, gas resistance

    [iot00f:root#] cat /www/remote-hand/tmp/.gpiodi_read_data
    di[0]=1
    di[1]=1
    di[2]=1
    di[3]=0
    gpio_i2c=17:25:15,10.2,43.0,1019,3436,21
    Date/time, temperature, humidity, pressure, gas resistance, air quality
    [iot00f:root#] cat /www/remote-hand/tmp/.gpiodo_write_data
    do[0]=0
    do[1]=0
    do[2]=0
    do[3]=0

    Connect the BME680 environmental gas sensor to display a graph

  • Please check the source code below
    https://github.com/kujiranodanna/IOT-House/blob/master/raspberrypi/usr/local/bin/pepogpioctld

pepoalexado

What is pepoalexado

  • Created to turn on / off the lights with Alexa and listen to the temperature, get GPIO output and json data to the Raspberry Pi distributed in the IOT house
    pepoalexado
    usage /usr/local/bin/pepoalexado host user password [write->chno:0-17 [DO:0|1] [timer->1 to 300000ms]] or read->json_name

  • GPIO 3 ON
    pepoalexado iot001.local remote hand 3 1

  • GPIO 3 OFF
    pepoalexado iot001.local remote hand 3 0

  • Acquire json data of I2C gas sensor BME680
    pepoalexado iot001.local remote hand gpio_i2c
    { “date”: “08:47:11”, “temp”: “27.5℃”, “hum”: “79.7%”, “pres”: “1006hPa”, “gas”: “2055427Ω”, “iaq”: “17” }

  • Acquire barometric pressure data of I2C gas sensor BME680
    pepoalexado iot001.local remote hand gpio_i2c.pres
    1020hPa

  • Get low / high outdoor illuminance-> Use for judgment such as turning on the lights in the room when the outdoor illuminance becomes dark pepoalexado iot01f.local remote hand ai2di12
    low

  • GPIO port 4 input of iot01f.local low-> high Execute the event registered command dio3high
    dio3high has registered a module camera 10 second video mail, which can activate the module camera of Raspberry Pi connected to another camera from the GPIO input event without camera connection
    Used to activate security cameras on Alexa at Practical IOT House
    pepoalexado iot02f.local remote hand dio3high

  • While a browser such as chrome is browsing https://iot01f, the browser returns voice operation and response with the registered wording.
    pepoalexado iot01f.local remote hand voice_req Turn off the light-> Turn off the light and execute
    pepoalexado iot01f.local remote hand voice_req Tell me the room temperature-> The room temperature is 24.0 ℃

  • Alexaのhomebridge/config.json Setting Example

    Alexa, turn on the dining

    Alexa, dining Turn off the lights

    Alexa, security camera on

    Alexa, security camera off

    1
    2
    3
    4
    5
    6
    7
    8
    9
    10
    11
    12
    13
    14
    15
    16
    17
    18
    19
    20
    21
    22
    23
    {{{
    "platforms": [
    {
    "platform": "Alexa",
    "name": "Alexa",
    "username": "user",
    "password": "pass"
    }
    ],
    "accessories": [
    {
    "accessory": "CMD",
    "name": "dining",
    "on_cmd": "sudo /usr/local/bin/pepoalexado iot001.local remote hand 3 1",
    "off_cmd": "sudo /usr/local/bin/pepoalexado iot001.local remote hand 3 0"
    },
    {
    "accessory": "CMD",
    "name": "security camera",
    "on_cmd": "sudo /usr/local/bin/pepoalexado iot03f.local remote hand dio3low",
    "off_cmd": "sudo /usr/local/bin/pepoalexado iot02f.local remote hand dio3high"
    },
    }}}
  • Please check the source code below
    https://github.com/kujiranodanna/IOT-House/blob/master/raspberrypi/usr/local/bin/pepoalexado